IMPORTANT!
For your security, the certificate can only be downloaded once and you must do so from a computer. After downloading it, you can install the file on other devices.
You have 90 days to download. If you do not do so, you will have to go through the application process again and go to a Registration Entity to identify yourself.
Watch this video in other languages
In order to use your idCAT Certificate you must follow the following steps:
Public keys are used to verify that the certificates that arrive at our computer equipment have been issued by one of the certification authorities in the hierarchy of entities of the AOC Consortium.
To download the two public keys, click on the following links:
1.- key of the Consortium's certifying entity AOC
2.- Citizen certification entity key
3.- Key of the Consortium's certification body AOC CA CONSORCI AOC (G3) ROOT-A (new)
4.- Key of the citizen certification entity SubCA CIUTADANIA Q (G3) A.2 (new)
Depending on your browser , follow these installation steps:
- Edge and Google Chrome on Windows operating system:
- Save the files to your hard drive.
- Run the file and follow the wizard's instructions.
- Mozilla Firefox on Windows, Linux or Mac system
- Save the files to your hard drive.
- Within Firefox, import the downloaded file by opening the options from the right side menu, Options > Advanced > Certificates > View certificates > Entities tab > Import > Select file.
- Safari and Google Chrome on Mac
- Save the files to your hard drive.
- Double-click on the downloaded file, and accept the installation in the certificate store.
- Access Keychains on Mac - Certificates tab - double-click on the EC-ACC public key and the CA CONSORCI AOC (G3) ROOT-A public key and in the "Trust" drop-down box, check "Always trust".
- The password requested upon completion is your Mac password.
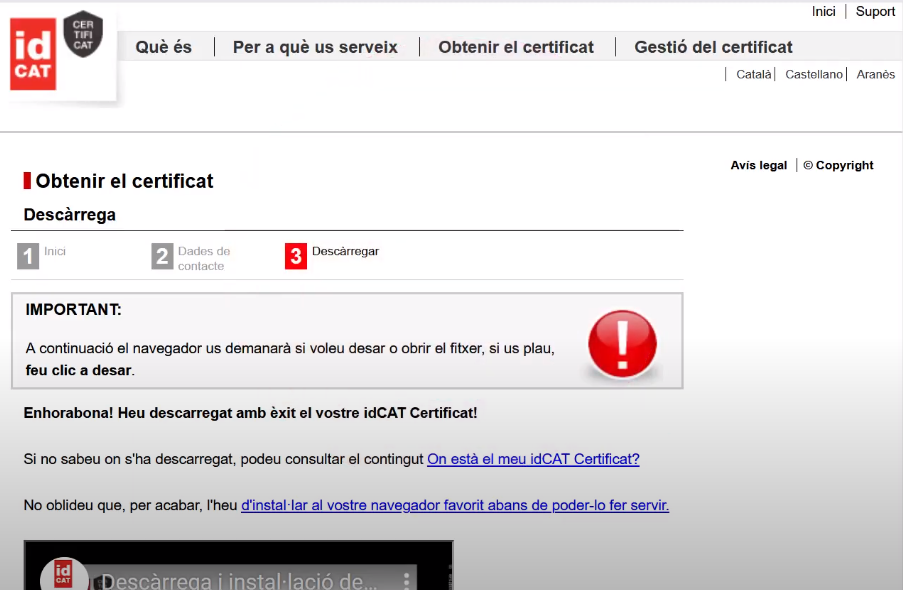
The deadline to download the idCAT is 90 days and 10 attempts from the date of issue. To do this, access the website idcat.cat/descarga from a desktop or laptop computer and fill in the identification data, completing the fields:
- Type of identification document: choose the type (NIF, NIE, DNI from other countries or Passport)
- Shipping country: choose the country
- Document number: enter it as it appears on the document.
- Management code (password): enter the sequence you have on the delivery sheet or that you received in the email
- Personal code: enter the code that you indicated to the idCAT Registration Entity and that only you know.
Once the details have been completed, click Continue, the website will display the certificate details and contact details. Review them and before clicking Download , keep in mind that if you use:
- If Windows asks you to “Save” or “Open” the file, click “Save” so that it is saved in the location defined for downloads in your browser.
- On Mac and Safari, the browser will ask you if you want to allow or block the file download. Click "allow" to complete the download process.
Once done, a message will appear confirming that the download has been completed correctly.

To install the idCAT Certificat on Windows, search for the file with the .p12 or .pfx extension on your computer in the "Downloads" folder and double-click on the file and then follow the instructions of the wizard.
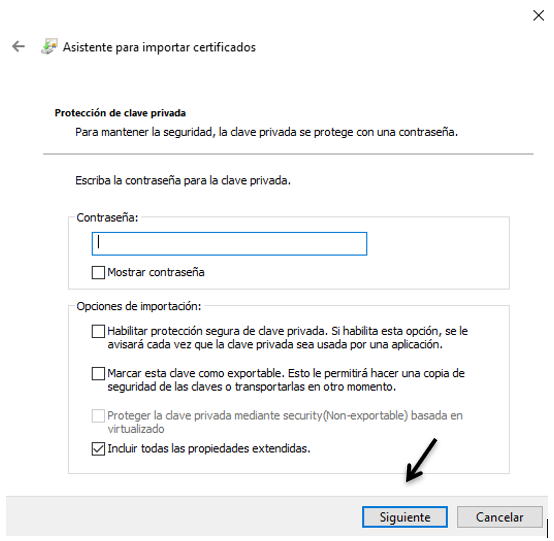
During the process the assistant will ask you the following:
- Locate the digital certificate to the current user (recommended as it is a personal certificate)

- The password is the Management Code that appears in the email you received or on the delivery slip.
- Check the option "Enable secure protection of the private key" if you want to protect your idCAT certificate with a pin for its use (optional).
- "Check the option "This key is exportable" (recommended option) if you want to be able to make a copy of the idCAT certificate to another browser or device later."
Click next on each step until you reach "Finish" and you will have the idCAT certificate installed. Now if you want you can check the operation of the idCAT.
Important : Once installed, we recommend that you keep the idCAT Certified file with the .p12 or .pfx extension.
Before installing the idCAT Certificate on your Mac, check that you have the padlock icon in Keychains - Login open:
Below you have two options to install the idCAT Certificate on your Mac:
1. By double-clicking on the certified idCAT file:
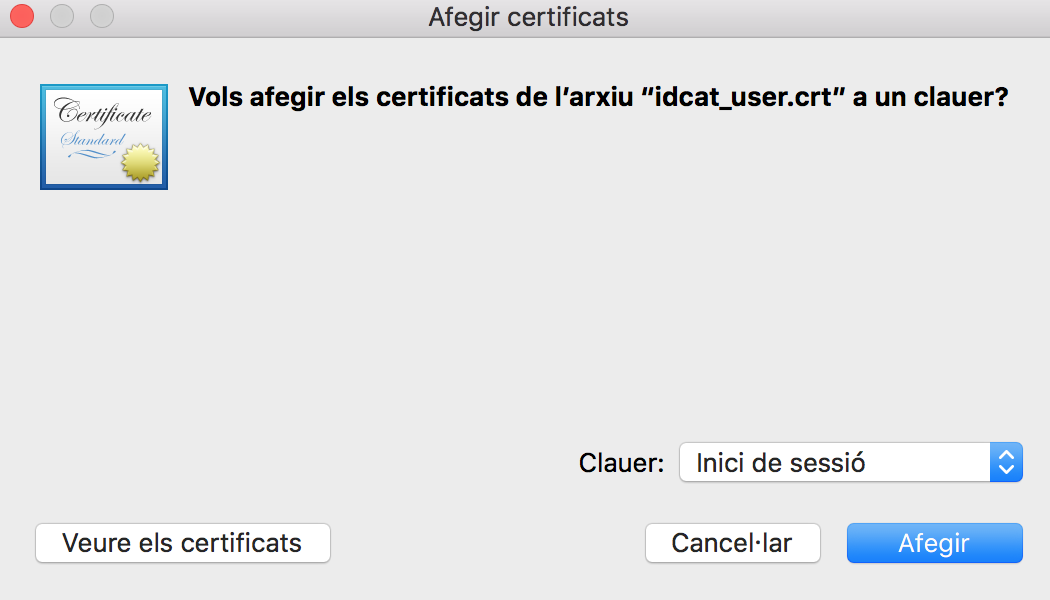
Find the file with the extension .p12 or .pfx on your computer in the "Downloads" folder and double-click on the file and follow the instructions of the wizard, keeping in mind that:
- The wizard may ask you where to add the idCAT certificate, select from the "Keychains" drop-down: Login (recommended option since it is a personal certificate) and press the Add button to install the certificate.

- The assistant may ask you for two passwords: the first, that of the system administrator and the second, that of the management code (password) that appears in the email you received or on the delivery slip.
Once the wizard is complete, access the Keychains folder - "My Certificates" tab, double-click on your idCAT certificate and in the "Trust" drop-down box, check "Always trust". When you do this, the system will ask you for your Mac credentials:
Once done, you will have the idCAT certificate correctly installed. Now, if you want, you can check the operation of idCAT.
2. Import the idCAT Certified file to Keychains:
Go to Keychains and click "File" > "Import Items..."
Then find the file with the .p12 or .pfx extension on your computer, for example in the "Downloads" folder and click "Open".
You will be asked for a password, which is the management code (password) that appears in the email you received or on the delivery slip, and click "OK".
Once the wizard is complete, access the Keychains folder - "My Certificates" tab, double-click on your idCAT certificate and in the "Trust" drop-down box, check "Always trust". When you do this, the system will ask you for your Mac credentials:
Once done, you will have the idCAT certificate correctly installed. Now, if you want, you can check the operation of the idCAT.
Important : Once installed, we recommend that you keep the certified idCAT file with the .p12 or .pfx extension.
To install the idCAT Certificate on Linux, open the Mozilla Firefox browser, go to Tools>Settings>Privacy and security>Show certificates and click Import.
Follow the steps of the wizard, it will ask you to select the file in .p12 or .pfx format corresponding to the idCAT, and the password, which is the management code that appears in the email received and on the delivery sheet.
Once done, you will have the idCAT certificate correctly installed. Now, if you want, you can check the operation of idCAT.
To install the idCAT Certificate on your Chromebook, go to the Chrome browser in "certificate-manager" and click import and follow the steps indicated by the wizard:
You can check if it is correctly installed by entering the certificate details:
IMPORTANT: You must install the public keys indicated in Step 0 of this FAQ from the “Issuing Entities” option of the certificate-manager and check “trust this certificate on websites” in each public key:
Once done, you will have the idCAT certificate correctly installed. Now, if you want, you can check the operation of idCAT.
Important : Once installed, we recommend that you keep the certified idCAT file with the .p12 or .pfx extension.
IMPORTANT : To be able to install and use idCAT Certificat on a mobile device, you must first have downloaded the installation file on a computer and installed the public keys (follow steps 0 and 1).
Here are the steps to install the certificate on Android:
- Email yourself the certified idCAT file in .p12 or .pfx format
- Open the email from your mobile phone or tablet where you received the .p12 or .pfx file.
- Click on the attachment in the email to open it.
- You will receive a message to extract the certificate. Enter the management code (password) that matches the one on the delivery sheet and that you used to download the idCAT certificate.
- Then select the "app user certificate and VPN" option.
- Enter a name for the certificate (we recommend that you leave the default name and ID of the holder).
- Press "OK" and the idCAT certificate will be installed correctly.
You can also watch the video with the steps to follow:
Watch this video in other languages
If you don't have the original file, you can make a copy from the browser on the computer where you have it installed .
IMPORTANT : To be able to install and use idCAT Certificat on a mobile device, you must first have downloaded the installation file on a computer and installed the public keys (follow steps 0 and 1).
Below are the steps to install the certificate on iPhone/iPad:
- Email yourself the certified idCAT file in .p12 or .pfx format
- Open the email from your mobile phone or tablet where you received the .p12 or .pfx file.
- Click on the file attached to the email to open it and the following message will appear: Profile downloaded, review the profile in Settings if you want to install it.
- Go to Settings>Downloaded Profile (this option will only appear if you have previously done step 3).
- Select "Install".
- Enter your iPhone/iPad PIN
- Select "Install" again.
- When you are asked for the password for the identity certificate, enter the management code (password) that matches the one you have on the delivery sheet and that you used to download the idCAT certificate.
- Press "OK" and the idCAT certificate will be installed correctly.
You can also watch the video with the steps to follow:
Watch this video in other languages
If you don't have the original file, you can make a copy from the browser on the computer where you have it installed .
You might be interested